Saturday, December 14, 2013

Greenhouses...

One of my garden goals is to have a greenhouse...that isn't "gone with the wind"...

We are on our third greenhouse due to the weather in OK. We got our first greenhouse at Sam's Club several years ago. I really liked that greenhouse. It had a table and a bin for potting mix. To the right is a picture of the greenhouse during construction.


Below are pictures of what happened to it after a tornado came through our property.


The greenhouse was located in the backyard where our traditional garden used to be, but after the tornado, it ended up all around the yard. Part of one wall ended up in the front yard. Another piece was "javelin thrown" into the side of our house. Crazy!!!
So...Larry set out to build another greenhouse. He built a floor for it and then put up a hoop house. It was green pvc pipe with a plastic cover over it. It worked great until we had a strong sustained wind for a few days. We tried to salvage the plastic with duct tape, but that did not work very well.
 Here is the same greenhouse floor and another attempt at a greenhouse. The greenhouse is situated on the south side of the house by the pool. We hoped that putting it here would block some of the wind, but it hasn't worked so far. We figure that this will be another temporary attempt to have a greenhouse until we are able to build a stronger one to endure the winds in Oklahoma.


One thing that we do like about this greenhouse is the discovery of Snap Clamps. With a few pieces of pvc pipe, some plastic and Snap Clamps, you can have a functioning greenhouse. If you don't have strong winds, it will work great. It's the windy parts of the country that need industrial strength greenhouses.

 The next four pictures are on my Garden Anywhere pinterest board. These are ideas for future sustainable greenhouses.

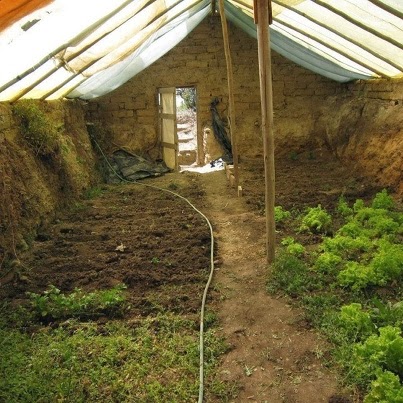
The first one seems like the most sturdy. Part of it is underground which is what is needed in windy places. It looks like it would be a lot of work, but maybe with an experienced backhoe person, it would not be too bad. The top would still be tricky, but we'd figure it out. There's always plastic, but there are other options, too. There is a clear corrugated plastic that might work. We have it on one of our storage buildings. It lets in the light. That would be great for the top of the inground greenhouse.

Here is another idea that I really like.  It is an old school bus that has been turned into a greenhouse.  I'd like to find an old bus that does not run anymore and convert it into a greenhouse. That should be able to take the OK winds...except maybe a tornado...

This bus just happens to on wheels and still running. We've looked into getting a bus for our business. This is something that we would love to do someday...

“Garden Anywhere Bus”
We would travel around to schools and teach children how easy it is to have a garden with no weeds.
Another idea is to turn a room of your house into a greenhouse. We have two spots that are perfect for adding onto our home. I think we all need to rethink what we can do when it comes to gardening. What CAN you do to be able to 1.) grow your own food and 2.) garden year 'round? Look at your property and see what you can do to make this happen.
The picture below is not really a greenhouse, but it's on my list of Dream Gardens...This is an enclosed garden free from pests...but also free from bees...I'll have to figure out how to let the bees enter and keep out the pests.


UPDATE -October 2014:  I decided that I should update this post to show our most recent greenhouse.

Larry took the parts from the other two hoop houses and made a new one. This time he attached it to the house. Hopefully, this one will be sheltered from the winds and being anchored to the house will give it stability. 

Starting the greenhouse. PVC Pipe.

The frame is going up!

Plastic on and some plants moved in. 

More plants...and cats. They like the heater. 


Friday, December 13, 2013

Soup, Cornbread and Spice...

I made some Hamburger Soup today, although I should call it Deer-burger soup since I used some deer meat that my neighbor gave me. It was really good, but it was missing some cornbread. I got out my trusty recipe for Homesteader Cornbread.  I like to divide the cornbread batter into two glass pie plates so that I can make one plain for the kids and one spicy for Larry and me.

I wanted to use some peppers that we grew this past summer to spice up "my" cornbread. I tried to grind a batch of  dehydrated peppers into powder. I put them into my food processer. That was a fail. They did not grind at all. They just got dizzy.

I decided to try my Blendtec. It is advertised to take on golf balls (not recommended by the normal layperson...lol). I figured it could handle some peppers...and it did. Brilliantly! The first pic is of the peppers. The second pic is how they looked after the food processor. The third pic is the powder that I hoped for.


I love growing my own peppers. I can't wait until next year. I have several varieties that I want to try. Chocolate Habanero, Carribbean Red and the hottest pepper recorded, the "Carolina Reaper". Check out Pepper Joe's to see his assortment of HOT peppers. Even if you just grow them to dry them and smell them...it's worth it!

Wednesday, December 11, 2013

Water and Other Important Storage Items...

How many of you have been housebound for the last few days? How long could you survive without going to the store?

I've been pondering on the thought of "what if..." for the last few days. I feel pretty good about what we have stored, but realize that I definitely don't have enough "fun" food stored.

I need to work on that.

What do you consider essential storage items?


Another thing that I've been thinking about is water storage. We have blue barrels of water stored in case of an emergency. We have two rain barrels hooked up to the house and hooked up to our watering system which help us to water the boxes and use less water. That is a plus. We also have barrels that we use to store water in case of an emergency.

I've been reading (conspiracy theories...lol) about the state of our water supply. I don't know what to believe. Is our government really selling water to Nestle so that they can bottle it and sell it back to us? Are barges full of water being shipped to China? In some states it is illegal to collect rainwater that falls from the sky onto your property. How long before that will be nation-wide? 

One article that I read stated that to control a population such as the United States, one would only need to control the essential elements for survival...food, water and shelter.

Monsanto is doing a pretty good job of trying to control our food supply. That's why it is so important to start NOW to plan how to grow at least some of your own food. 


Another article (coincidentally on the same website as the above article, but I've seen it on other sites) states that under The Clean Water Restoration Act, the EPA is in control of all
navigable waters."  


On the surface, the term, "navigable waters" would seem to provide some measure of protection to the public from invasive EPA enforcement by placing some reasonable limitations on the EPA's regulatory power. Alas, this is proving not to be the case. 

The Clean Water Restoration Act goes far beyoud the original intent of the law which was the protection of waterfowl and the conservation of wetlands. The proverbial fly in the ointment has its roots in the recent movement of the term "navigable waters".

Under the new guidelines, if you use well water, the EPA has jurisdiction over your property and can even forcibly evict you and your family. If it rained overnight, or if you had runoff from a recent snowfall, and there are any resulting puddles on your property, this can result in the loss of the free use of your property. You are subject to eviction from your land if your property resides above an underground aquifer." 

THIS IS SCARY!!! 

Because I have not been directly affected by this, it's easy to rationalize and think that this could not really happen. People (with guns) would not show up on my doorstep and evict me from my property...would they? It is up to each of us to be aware and do what we can, while we can, to get out houses in order. Conspiracy theory or not, we need to be prepared for whatever the future may bring.

Sunday, November 24, 2013

My Favorite Banana Bread Recipe

Since I'm in the baking mood and have some bananas that I need to use, I thought I'd share my favorite recipe for Banana Bread.

I have an old cookbook called, "Beat This". This is
a compilation of "the best" recipes. There are recipes for apple crisp, blueberry muffins, mashed potatoes, gravy, meat loaf, sugar cookies,  etc...and the best banana bread.

This was my "go-to" banana bread recipe for years, but it did bother me a little that it used TWO sticks of butter. Not very calorie conscience.


Now I have found another banana bread recipe that I absolutely love. It's called Cinnamon Swirl Banana Bread. It uses only 1/3 cup of melted butter and I usually add half butter and half coconut oil. What I love about it is the cinnamon sugar that you add to the middle of the muffin/bread and the cinnamon sugar that you sprinkle on top before baking. Sweet! I prefer making muffins instead of bread for two reasons. I can make mini muffins and not eat as much at a time and also there is more cinnamon sugar per mini muffin. I love that extra little cinnamon swirl.

Another thing that I thought I'd share is my favorite muffin tin liners. I have some cute designer liners that I use for special occasions, but if I used them every time I made muffins, I'd go through them pretty fast. I found some "everyday"  liners on Amazon. These muffin tin liners are white, come 500 to a box and are only $10.95.


White Chicken Chili


It's sleeting outside right now. The first snow of the season is on the way. It's a good day to stay inside and cook. One thing I am making today is White Chicken Chili. I already have a crockpot of beans that will be perfect to add to my chili. .
 
White Chicken Chili

1 lg onion, chopped
½ c butter, divided                     
¼ c flour
1-2 c Chicken broth           

 2 c half and half
1 tsp Tabasco or to taste  

1 tsp chili powder
½ tsp cumin                                           

 ½ tsp salt
1 4oz can chopped chilies

2 cans white beans, drained and rinsed
2 lbs chicken, cooked and cut into ½” chunks                                      

sour cream
6 oz Monterey Jack cheese, grated

Cook onion in 2 Tbsp butter till soft.  In large pan, melt remaining 6 Tbsp butter over low heat and whisk in flour to make a roux. Cook roux, whisking constantly for 3 minutes. Stir in onion. Gradually add broth and Half and Half, stirring constantly. Bring mixture to a boil and simmer, stirring occasionally, 5 min till thick.

Add remaining ingredients except for sour cream. Cook over moderate low heat for 20 minutes. Stir occasionally. Take off heat and stir in a dollop of sour cream. Serve with salsa and garnish with cilantro if desired.


Saturday, November 9, 2013

ReGrow Celery

I saw a post on Pinterest a while back about veggies that you can regrow in your kitchen.  I've tried to regrow carrots and the occasional avocado seed, but I got bored. I never had much luck, until...I tried celery. I really like regrowing celery. I make my own chicken broth and use carrots, celery and onions. I save the last 4 inches or so of the stalk of celery and put it in water. In just a couple of days, I have celery regrowth. I let it get a little bigger, changing the water daily, and then stick it in a Garden Anywhere box.

To the right is my little celery garden. (I've been making a lot of broth lately.)

Below is a celery plant that I planted near the tomato plant that we have growing inside.


 The picture below is one of some celery that has been outside in an older Garden Anywhere box. This is my cut and come again celery. That is the beauty of regrowing some veggies. You just cut off what you need to season your meal and the plant continues to grow. Truly a year round harvest right at your fingertips.

Thursday, November 7, 2013

Apron Bonnets and Pioneer Treks

Remember the garden aprons that I showed you this past summer?


Well, I have a different apron to show you today.


When I was in elementary school, many years ago, one of our cafeteria ladies brought some really cool aprons to sell. They weren't just aprons, though. With the buttoning of a couple of buttons, they turned into bonnets. I thought that was the coolest thing!  I had to get one for my mom. I'm not sure that she used the bonnet function, but she did wear the apron. 
 A few years ago, our family was invited to participate in a Pioneer Trek. I got busy sewing shirts for my husband and boys and long, gathered skirts for my daughter and me. I thought back to that apron/bonnet and  decided that it'd be the perfect accessory to our attire. I did a search on the internet, but was hard-pressed to find a pattern...until I stumbled across a little shop called Country Patterns. It was here that I found a pattern for an Apron Bonnet.


I was so excited. I quickly ordered the pattern. When it arrived, I got to work. I made four bonnets. Two were out of the same fabric for my daughter's and my "Sunday Best" bonnets. The other two were just fun prints that I had. One was a print of Pioneer bears that I thought would be appropriate to a Pioneer Trek.

 Here are some pics of the finished bonnets. The one to the left shows the apron and bonnet.  I thought I'd share these aprons just in case you are looking for that perfect gift for your favorite gardener...besides the present of a Garden Anywhere Box, of course. :)


Sausage and Bean Soup...an old recipe...

One of my favorite soup recipes comes from a very long time ago Southern Living magazine. I haven't made it in a while. I don't know why. My go-to soups are either Chicken Tortilla , White Chicken Chili or Chicken Noodle, but today seems to be a Sausage and Bean soup kind of day.

This is not your standard soup recipe...I discovered...while trying to find the recipe on the internet. The recipe does not call for spinach or pasta, sweet potatoes or smoked sausage, which is what I was finding during my search. I had to break out my OLD cookbook of favorite recipes that I put together years ago. So, here's my recipe for:


Sausage and Bean Soup

Ingredients:

1 lb. hot sausage (regular, if preferred)
Large can crushed, fire roasted tomatoes
3 c. chicken broth
2 potatoes, large dices (I don't peel)
1 lg. can beans (pinto, kidney or black-I prefer Bushes Chili Beans)
 bag frozen corn (I like to use the yellow and white mix)

Directions:

Cook sausage and drain grease. Add crushed tomatoes and chicken broth to sausage. Add potatoes. Cook over medium heat until potatoes are tender. Add chili beans and corn. Heat to warm.

This recipe is very versatile. You could saute an onion, some celery and bell pepper with the sausage if you like. You could add some (heart-shaped or chopped) carrots along with the potatoes. You could even add cream style corn, if you like. I've made it all kinds of ways, but above is the basic recipe.

Friday, November 1, 2013

Fiery Kitchen Sink Chili

Color me surprised and happy! I won a chili contest. We had our annual Trunk or Treat/Chili dinner at chuch last night. I usually bring White Chicken Chili (which is amazing, btw) just to offer a change from all of the other chilis. This year, there was a request for someone to make some spicy chili. I decided to try my hand at spicy chili since I had SO MANY dehydrated jalapeno and habanero peppers from the garden this past summer.

I'm reconstructing the recipe as close as I remember. I made it up as I went along... ;)
I had ground venison in the freezer, compliments of our neighbors (Thank You), so that's what I used. With all of the additions, this made a little over a crock pot full. I scooped out a few cups and put it in a saucepan. I also made some Mexican cornbread to go with the chili. (Recipe to follow on another post along with the White Chicken Chili recipe...as if you need another one, but this one)

Feel free to adjust the peppers and spices to your taste. The funny thing is that even with all of the peppers, it's only really HOT if you actually eat a pepper. The dehydrated ones are big enough to see and avoid. The chopped ones only added a little kick, but not a burn. I believe that the dehydrated peppers added a little smoky earthiness that you just don't get with fresh peppers.


p.s.  I took a picture of the chili with my phone to send to my husband to show him what some spicy chili looked like. I never dreamed that the picture would come in handy later.


Fiery Kitchen Sink Chili


2 lbs. ground venison or hamburger
1 onion, chopped
4 jalapenos, chopped with seeds
4 habanero peppers, chopped with seeds
3 cans crushed Fire Roasted Tomatoes (Muir Glen)
2 c. roasted tomato and fig sauce
2 lg. cans Bushes Chili Beans
1 lg. can red kidney beans, rinsed and drained
¼ jar Suan’s Scotch Bonnet Pepper Jelly
½ c. dehydrated jalapeno and habanero pepper slices (more or less to taste)
½ c. chili powder
2 t. cumin    
2 t. Slap Your Mama
1 t. garlic powder
1 t. chocolate chili spice
1 t. Jamacian Jerk seasoning
1 t. smoked paprika
Brown meat and drain fat. (No fat with venison) Add onion and peppers and sauté. Add meat to crockpot. Add beans, tomatoes and seasonings. Stir. Cover and cook on low for 6-8 hours.


Tuesday, October 29, 2013

Garden Quilts

Now that the weather is turning cooler and things are slowing down in the garden, my mind wanders to other pursuits. I want to start a garden quilt. I have lots of fabric just waiting to be turned into something beautiful. How about you? Do you like to quilt? Have you ever made a quilt? You don't have to start out big. You can start with a mini quilt or a wall hanging.

I've included some quilting ideas for motivation. 
 You can piece together things you'd find in a garden. Be creative and make your own design or find a pattern that you like and add your special touch.

One year I took a class on how to make a crayola quilt. Coloring is relaxing and coloring on a quilt is fun! You could find some coloring pages of veggies, fruit and/or flowers and make your own unique crayola quilt .

 This is a flower garden pattern with a Log Cabin flair. I love the look of the Log Cabin quilt with the red square in the middle. That is the heart of the home. You can pick some really pretty floral fabric or veggie fabric and make "garden" rows.

Check out this link to learn more about making a log cabin flower quilt .Here's a little more history on the log cabin pattern.

 This is another example of a flower garden quilt. Lots of little patches that can either be floral or vegetable prints. Quilting is like cooking for me. I can take a basic pattern or recipe and add my favorite things to make it personal for me. I love reds, greens and golds, so I like to use those in my quilts. What are your favorite colors?

Here's a cute fall mini quilt . Imagine this being your garden layout with all of the brilliant oranges,  golds,greens and browns of fall.

 Follow this pinterest link to see simple projects like Christmas mug rugs for that warm cup of hot cocoa.
 Here's a mini quilt version with appliques. I love to add appliques to my quilts. I prefer hand work to machine sewing. There's something so personal about sewing by hand. I like to machine sew the basic design and then embellish with my own touch.

Mini quilts are fun to make, especially if you are a first time quilter.  
This is Grandmother's Flower Garden. It's a hexagon pattern and possibly at bit more difficult than just sewing patches together, but still fun and rewarding.

Click on the link to read more about the history of Grandmother's Flower Garden and other quilt patterns.


Here's a picture of a wall hanging a made a few years ago. I found the basic pattern in a magazine and then added one panel of some favorite words to a hymn that I like. I chose my favorite colors and got to work. The tree was original, too. Hearts and kind words just seem to go together.

Take the time this season to make a garden quilt. It is something that will last long after the garden has gone to seed.

Monday, October 28, 2013

Sprouts

Have you ever grown your own sprouts? They are packed with nutrition and are very good for you. You can have a constant supply of fresh sprouts right in your kitchen no matter what time of year or weather conditions.

I want to share with you my favorite way to grow sprouts. This is a video from Handy Pantry that shows different methods. I used to grow sprouts in jars, but prefer using trays now. This video is about 14 minutes long. If you want to watch it all, it's very informative, but if you want to skip to the part about the Sprout Garden Trays, it starts at about 9:20 into the video.

how to grow sprouts

The sprout trays are really nice. You get three stackable trays in a package. You can grow three different kinds of sprouts at once, or start seeds daily so that you'll have a constant supply of sprouts available.  You can also buy more trays and have a sprout tower.  I like to grow alfalfa sprouts, but there are so many other seeds to choose from. Right now, I've got a 5 bean salad growing. This is a combination of alfalfa, broccoli, radish, mung bean and green lentils. Crunchy, delicious and nutrient packed. Add to a salad, sandwich or smoothie or eat it all by itself with a spritz of lemon juice if desired.

There are several companies that sell sprout seeds. Sprout House or Sprout People are two places that I'm familiar with. Handy Pantry is a company that I've used for years. They have a variety of organic seeds. I buy my seeds in bulk in cans to store them for the long term. You can also find seeds and growing supplies at your local health food store.

Consider adding sprouting to your indoor garden. You will reap the healthy rewards.

Saturday, October 26, 2013

Brown Rice Vinegar-Can BRV Help Your Plants to Thrive?

I was at the acupuncturist the other day while Larry was under the needles for his Bell's Palsy. I was talking with Master Kim's wife about her beautiful plants all around the reception area. She said that she adds one cup of brown rice vinegar to ten cups of water and uses that to water her plants. She said that her family in Korea uses brown rice vinegar also when gardening.

So, I did some research. I know that ACV has health benefits, but did not know anything about BRV. I found one article on Brown Rice Vinegar, but hoped to find some scientific research on how beneficial BRV is to vegetables growth. I did not find much.  I suppose that I will have to do my own research.

The article suggests using Kyushu vinegar. It is pretty expensive. It would be good to use in cooking or as a health tonic like ACV, but I'm not sure about your plants. Master Kim's wife showed me the bottle that she uses. You can get it in a Korean market. It's in a gallon jug and is not very expensive.

You could also make your own Brown Rice Vinegar. That might be a fun experiment.
One great thing about Garden Anywhere Box is that it is open to experimentation. We know how to make the boxes and the watering system. We put fertilizer and dolomite into the potting mix each season, put the plastic cover on and plant the plants. After that, there is room for experimentation, just as you might experiment in a traditional garden.

Depending on how much BRV you add, the pH may be on the acidic side. That could be a good thing. Here is an article about which plants actually prefer a bit of an acidic environment. 


What would happen if you added a cup of BRV to the water reservoir? Or two cups? You don't want to overdo and kill your plants, so maybe try experimenting on some "test subjects" first. I'd love to hear from you about what works and what does not work when trying new amendments to the Garden Anywhere Box. Let's learn from each other.

Thursday, October 17, 2013

Becoming Independent and a Mindset Change

For most of our 30 years of marriage, my husband and I have tried to have a garden. Each summer we'd plan and till, weed and rake, weed and rake some more, plant our seeds, water the garden and wait. Sometimes we were successful and things would grow. Sometimes we were not so successful. It would rain...a lot...and wash away our garden. Or it would be so hot that everything would burn up no matter how much we watered and we'd give up until the next year. Sound familiar?

If you've been following my blog, you know the story of how Garden Anywhere Box was born. If not, here's my very first blog post explaining how it all began. A Lazy Gardener


One reason that we wanted to have a garden was to grow at least some of our own food. I think that is why we kept trying all of those years instead of just giving up. Growing your own food is an important skill to have. Right now, we are blessed to be able to go to the store and buy what we need to sustain life. We are very blessed!

But... what if that were to change? Is it changing already? Maybe not for you, but it has changed for some people. Fresh vegetables are expensive. Add to that the cost of organic and you are talking major dollars each time you go to the store. What about genetically modified foods? ( GMO's)  If you have not read about GMO's or "Frankenfood" as some people call it, then you should educate yourself. What are you really getting at the store?


Because of the growing unrest and uncertainty in the world, it seems more important than ever to have a garden. The time is now to begin to grow at least some of what you eat and to teach your children how to garden. Growing a garden in a Garden Anywhere Box makes gardening so easy. Believe me. We've tried just about everything. Traditional garden, raised beds, square foot, containers...They all came with their own particular headaches. I'd just about given up on having a garden that produced anything but weeds until I discovered Earth box. It is a container garden with a twist. A cover over the top to keep weeds out and moisture in and a water reservoir in the bottom. You don't over water or underwater. We had good luck the first year growing tomatoes in our Earthbox.

That would have been just fine, except my husband decided to try to make his own boxes and eventually a watering system that watered all of the boxes at once. The watering system is what makes Garden Anywhere Box different than Earthbox and different than any other gardening method out there. We have had great success using this method of gardening. By using our boxes, I believe that gardening can be successful for you, too.

It is important to have the freedom that gardening provides. I have always been into preparedness. I plan for "what if" and "someday". I don't live in fear and I don't hoard food, but I believe that if we are prepared for what may come, we have no need to fear. That is a good feeling.

Garden Anywhere Box can give you peace of mind and help you be prepared for "what if". You can change your mindset from, "I can't garden" or "I have a brown thumb" or " I kill everythingto  "I can grow my own food" and "I can grow something year 'round". It is definitely a change in your mindset of how you see gardening, especially, if you've tried over the years and have not had success. With Garden Anywhere box, I believe you will experience the success that we've had. We are a family-owned company. We are here for the long haul. We want you to succeed and will help you to be successful.


Wednesday, October 16, 2013

Made in America

We have been talking for a while now at Garden Anywhere Box about the possibility (and necessity) of having our boxes manufactured. We have checked with different companies, but with no success. The prices are $$$ just to manufacture the mold, let alone manufacture the the volume of boxes that we would need to be able to be in stores like Lowe's or Home Depot. The saying that it takes money to make money is so true...

So, what to do? In the meantime, we do the best we can. Our family makes Garden Anywhere Box by hand. We cut out the parts and put them together. We put together the packets of fertilizer, dolomite and connector tubes that go with each box sold. We can truly say that we are not only "Made in America" but we are "Made in Oklahoma". We'd like to keep it that way.

We've looked into going overseas to manufacture our boxes. It would be less expensive because they don't have the regulations that the USA does. They also don't have child labor laws in place apparently. We don't like the feel of going overseas anyway. It might lower the cost of our boxes, but we would lose the right to call ourselves, "Made in America". Imho, it would not be worth it. Some day we'll be able to get our boxes manufactured here. Until then, you are witnessing a business beginning (literally) from the ground up. With faith and hard work, we will make our business grow.

Lessons Learned in the Garden-2013

As I reflect back on the summer of 2013, I'd like to share
what I've learned.

One thing I learned this summer is that I really do love to garden. I have not always felt this way. I have tolerated gardening, but I have not loved it. This year I had so much fun taking pictures of what I was growing. I looked forward to going out each morning to see what was ready to pick, finding just the right spot to photograph my basket and then sharing it on my FB page. I hoped that by sharing pics of what I was growing, it would motivate others to know that they could grow a garden, too. If I can do it, anyone can do it.

Another thing that I learned is that there will still always be bugs in the garden. I think that I get a little wiser each year and learn some tricks to help keep the bugs at bay. Companion planting is one of those things. There are lots of books out there about companion planting, but the one that I like is "Carrots Love Tomatoes" by Louise Riotte. She grew up in Oklahoma and wrote many books about gardening. Her books are well worth adding to your library.

I learned that planting dill with squash seems to help keep the squash bugs at bay. There are other herbs and flowers that are beneficial to plant among tomatoes and other veggies. The beauty of a Garden Anywhere box is that you can plant two tomato plants on the back side of the fertilizer strip and add some basil to the front of the box. Basil wards off bugs and improves growth and flavor. Learn what you can about companion planting and be ready when it's time to plant next year.

I learned that juicing cucumbers and freezing the juice to use in smoothies is a good thing. I had a bumper crop of cucumbers this summer. I'm not a big fan of canning or pickles, so I didn't want to use the cucumbers that way. My family does like smoothies, though, and frozen cucumber cubes are perfect added to a smoothie.

I did enjoy making "Cowgirl Candy" out of some of the cucumbers. The recipe is really called "Cowboy Candy". It uses lots of jalapenos. I tried it and it was way too hot for me. It could get milder the longer it sits, but I didn't want to take any chances. The syrup is really good. I didn't want to let that go to waste, so I fished out the jalapenos and added some cucumber slices. I called it Cowgirl Candy. It has a little kick, but not as much as straight on jalapenos. I added a bit of sliced red onion and ONE sliver of a habanero pepper to each jar. Yum!


I asked Larry what he learned this summer. He said that he learned (again)  was reminded not to over-plant the boxes. Even when those two tomato plants look TINY in the box, they will GROW. You can still add a few herbs to the box. Like I mentioned above, a couple of basil plants in the front of the box would be good. I planted oregano and cilantro in a couple of boxes along with tomatoes. They worked perfectly.

Another thing that Larry learned is to plant vining crops like gourds or squash where they can cascade down to the dirt. We did this with some of our vining plants (on accident). Some cucumbers and squash sprawled out on the deck, but we have boxes on a lower deck, too. We also planted sqaush and gourds down there. They sprawled out and began rooting in the grass. The roots and beginning of the plants were still in boxes, so no weeding. We still watered from the box, so there was water conservation. But by rooting again in the ground, the plants are taking off again. I love the boxes and don't ever want to garden the traditional way again, but if a plant wants to grow in the ground and I don't have to weed or water (much) I'm all for it.

Here's a picture of a gourd that I just harvested along with some of the last of the summers tomatoes, assorted peppers and chard. I still have a few more gourds to harvest. We'll see how they do with the colder weather.


Tuesday, October 15, 2013

Chicken Tortilla Soup


Chicken Tortilla Soup

 
I wanted to share my favorite recipe for Chicken Tortilla Soup. The recipe is from "The Pioneer Woman". http://thepioneerwoman.com/cooking/2011/01/chicken-tortilla-soup/  The only change that I made was to not add the cornmeal. I also buy tortilla strips instead of making my own. I use peppers, onions and tomatoes from the garden to give it that extra hominess and love. I also make my own chicken stock to add to soups and other recipe creations. You can add extra spice by adding jalapenos or habaneros...if you dare!
Ingredients
2 whole Boneless, Skinless Chicken Breasts*
1 Tablespoon Olive Oil
1-1/2 teaspoon Cumin
1 teaspoon Chili Powder
1/2 teaspoon Garlic Powder
1/2 teaspoon Salt
1 Tablespoon Olive Oil
1 cup Diced Onion
1/4 cup Diced Green Bell Pepper
1/4 cup Red Bell Pepper
3 cloves Garlic, Minced
1 can (10 Oz. Can) Rotel Tomatoes And Green Chilies
 
32 ounces, fluid Low Sodium Chicken Stock
3 Tablespoons Tomato Paste
4 cups Hot Water
2 cans (15 Oz. Can) Black Beans, Drained and rinsed
_____
FOR THE GARNISHES:
Sour Cream, Diced Avocado, Diced Red Onion, Salsa Or Pico De Gallo
Grated Cheese, Cilantro, Tortilla strips
 
Preparation Instructions

Preheat oven to 375 degrees. Mix cumin, chili pepper, garlic powder, and salt. Drizzle 1 tablespoon olive oil on chicken breasts, then sprinkle a small amount of spice mix on both sides. Set aside the rest of the spice mix.

Place chicken breasts on a baking sheet. Bake for 20 to 25 minutes, or until chicken is done. Use two forks to shred chicken. Set aside.

Heat 1 tablespoon olive oil in a pot over medium high heat. Add onions, red pepper, green pepper, and minced garlic. Stir and begin cooking, then add the rest of the spice mix. Stir to combine, then add shredded chicken and stir.

Pour in Rotel, chicken stock, tomato paste, water, and black beans. Bring to a boil, then reduce heat to a simmer. Simmer for 45 minutes, uncovered.

Check seasonings, adding more if needed---add more chili powder if it needs more spice. Add salt to taste. Turn off heat and allow to sit for 15 to 20 minutes before serving.
Ladle into bowls, then top with your choice of sour cream, diced red onion, diced avocado, pico de gallo, grated cheese and tortilla strips. (The garnishes really make the soup delicious.

* I usually cook more chicken than I need so that I'll have some left for other recipes like Chicken Potato Burritos or White Chicken Chili.
aPosted by Ree on January 8 2011